1.注册阿里云移动推送服务
2.项目引用组件
yarn add react-native-aliyun-push

react-native link
3.android配置
在Project根目录下build.gradle文件中配置maven库URL:allprojects {
repositories {
mavenLocal()
jcenter()
maven {
// All of React Native (JS, Obj-C sources, Android binaries) is installed from npm
url "$rootDir/../node_modules/react-native/android"
}
// 下面是添加的代码
maven {
url "http://maven.aliyun.com/nexus/content/repositories/releases/"
}
flatDir {
dirs project(':react-native-aliyun-push').file('libs')
}
// 添加结束
}
}确保settings.gradle中被添加如下代码:include ':react-native-aliyun-push' project(':react-native-aliyun-push').projectDir = new File(rootProject.projectDir, '../node_modules/react-native-aliyun-push/android')
确保app/build.gradle中被添加如下代码:dependencies { //下面是被添加的代码 compile project(':react-native-aliyun-push') //添加结束 }
确保MainApplication.java中被添加如下代码// 下面是被添加的代码
import org.wonday.aliyun.push.AliyunPushPackage;
import com.alibaba.sdk.android.push.CloudPushService;
import com.alibaba.sdk.android.push.CommonCallback;
import com.alibaba.sdk.android.push.noonesdk.PushServiceFactory;
import com.alibaba.sdk.android.push.register.HuaWeiRegister;
import com.alibaba.sdk.android.push.register.MiPushRegister;
// 添加结束
...
@Override
protected List<ReactPackage> getPackages() {
return Arrays.<ReactPackage>asList(
new MainReactPackage(),
//下面是被添加的代码
new AliyunPushPackage()
//添加结束
);
}
};
@Override
public void onCreate() {
super.onCreate();
SoLoader.init(this, /* native exopackage */ false);
//下面是添加的代码
this.initCloudChannel();
//添加结束
}
// 下面是推送添加的代码
/**
* 初始化阿里云推送通道
* @param applicationContext
*/
private void initCloudChannel() {
PushServiceFactory.init(this.getApplicationContext());
CloudPushService pushService = PushServiceFactory.getCloudPushService();
pushService.setNotificationSmallIcon(R.mipmap.ic_launcher);//设置通知栏小图标, 需要自行添加,注意这里是ic_launcher而不是ic_launcher_s
pushService.register(this.getApplicationContext(),"阿里云appKey", "阿里云appSecret", new CommonCallback() {
@Override public void onSuccess(String responnse) {
// success
}
@Override public void onFailed(String code, String message) {
// failed
}
});
// 注册方法会自动判断是否支持小米系统推送,如不支持会跳过注册。
MiPushRegister.register(this.getApplicationContext(), "小米AppID", "小米AppKey");
// 注册方法会自动判断是否支持华为系统推送,如不支持会跳过注册。
HuaWeiRegister.register(this.getApplicationContext()); }
// 添加结束
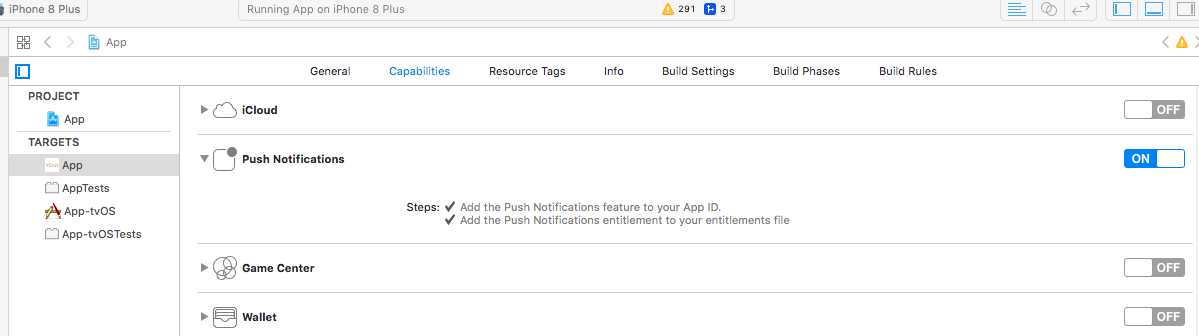
4.ios
去苹果开发者那里弄推送证书。。。(不多说了)
xcode-Capabilities打开下面两个

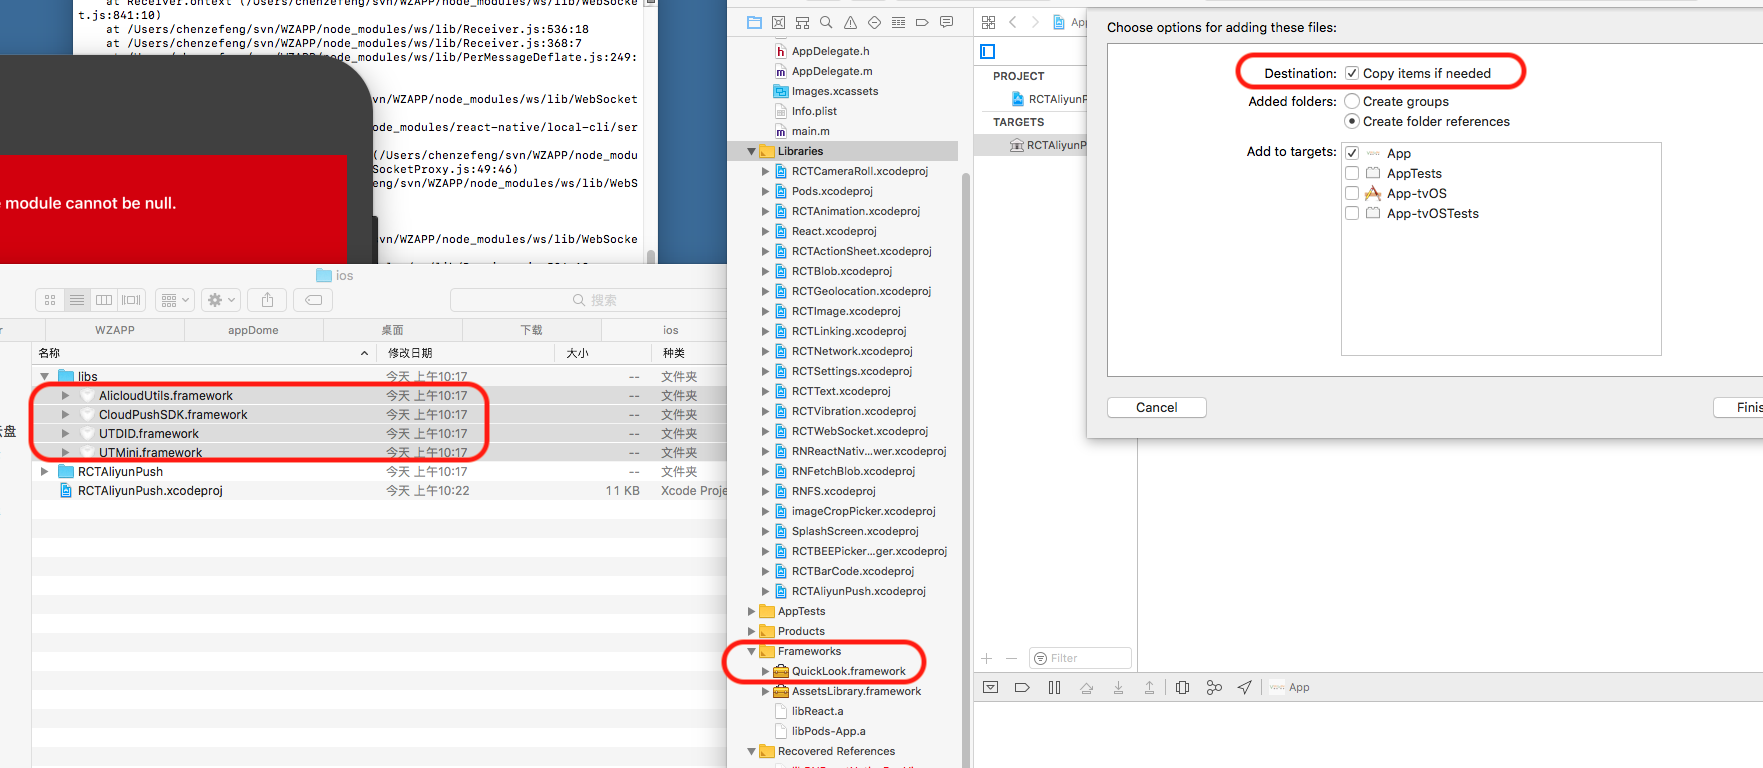
添加node_modules/react-native-aliyun-push/ios/RCTAliyunPush.xcodeproj到xcode项目工程
拖拽node_modules/react-native-aliyun-push/ios/libs下列目录到xcode工程的frameworks目录下,将copy items if needed打勾。 注意:从阿里云下载的SDK中UTDID.framework有问题,编译会报错,请使用react-native-aliyun-push中内置的版本。
- AlicloudUtils.framework
- CloudPushSDK.framework
- UTDID.framework
- UTMini.framework
- 点击项目根节点,在targets app的BuildPhase的Link Binary With Libraries中添加公共包依赖
- libz.tbd
- libresolv.tbd
- libsqlite3.tbd
- CoreTelephony.framework
- SystemConfiguration.framework
- UserNotifications.framework
同时确保targets app的BuildPhase的Link Binary With Libraries包含
- AlicloudUtils.framework
- CloudPushSDK.framework
- UTDID.framework
- UTMini.framework
- 修改AppDelegate.m添加如下代码/** * Copyright (c) 2015-present, Facebook, Inc.
 *
 * This source code is licensed under the MIT license found in the
 * LICENSE file in the root directory of this source tree.
 */

#import "AppDelegate.h"

#import <React/RCTBundleURLProvider.h>
#import <React/RCTRootView.h>
#import "AliyunPushManager.h"// 添加的代码
@implementation AppDelegate


- (BOOL)application:(UIApplication *)application didFinishLaunchingWithOptions:(NSDictionary *)launchOptions
{
  NSURL *jsCodeLocation;

  // 原来的jsCodeLocation保留在这里
   //jsCodeLocation = [[RCTBundleURLProvider sharedSettings] jsBundleURLForBundleRoot:@"index" fallbackResource:nil];
  //开发环境
//  jsCodeLocation = [NSURL URLWithString:@"http://192.168.1.96:8081/index.bundle?platform=ios&dev=true&minify=false"];
 //生产环境
    jsCodeLocation = [[NSBundle mainBundle] URLForResource:@"main" withExtension:@"jsbundle"];
  RCTRootView *rootView = [[RCTRootView alloc] initWithBundleURL:jsCodeLocation
                                                      moduleName:@"AppDome"
                                               initialProperties:nil
                                                   launchOptions:launchOptions];
  rootView.backgroundColor = [[UIColor alloc] initWithRed:1.0f green:1.0f blue:1.0f alpha:1];

  self.window = [[UIWindow alloc] initWithFrame:[UIScreen mainScreen].bounds];
  UIViewController *rootViewController = [UIViewController new];
  rootViewController.view = rootView;
  self.window.rootViewController = rootViewController;
  [self.window makeKeyAndVisible];
  // 下面是添加的代码
  [[AliyunPushManager sharedInstance] setParams:@"阿里appKey"
                                      appSecret:@"阿里AppSecret"                                   lauchOptions:launchOptions
              createNotificationCategoryHandler:^{
                //create customize notification category here
              }];
  // 添加结束
  return YES;

}
 // 下面是添加的代码
// APNs注册成功回调,将返回的deviceToken上传到CloudPush服务器
- (void)application:(UIApplication *)application didRegisterForRemoteNotificationsWithDeviceToken:(NSData *)deviceToken
{
  NSLog(@"test:%@",deviceToken);
  [[AliyunPushManager sharedInstance] application:application didRegisterForRemoteNotificationsWithDeviceToken:deviceToken];
}


// APNs注册失败回调
- (void)application:(UIApplication *)application didFailToRegisterForRemoteNotificationsWithError:(NSError *)error
{
  [[AliyunPushManager sharedInstance] application:application didFailToRegisterForRemoteNotificationsWithError:error];
}

// 打开/删除通知回调
- (void)application:(UIApplication *)application didReceiveRemoteNotification:(NSDictionary *)userInfo fetchCompletionHandler:(void (^)(UIBackgroundFetchResult result))completionHandler
{
  [[AliyunPushManager sharedInstance] application:application didReceiveRemoteNotification:userInfo fetchCompletionHandler:completionHandler];
}


// 请求注册设定后,回调
- (void)application:(UIApplication *)application didRegisterUserNotificationSettings:(UIUserNotificationSettings *)notificationSettings
{
  [[AliyunPushManager sharedInstance] application:application didRegisterUserNotificationSettings:notificationSettings];
}
// 添加结束


@end
5.项目代码
/**
 * Sample React Native App
 * https://github.com/facebook/react-native
 * @flow
 */

import React, { Component } from 'react';
import {
    AppState,
    Platform,
    StyleSheet,
    Text,
    View
} from 'react-native';
import AliyunPush from 'react-native-aliyun-push';

const instructions = Platform.select({
  ios: 'Press Cmd+R to reload,\n' +
    'Cmd+D or shake for dev menu',
  android: 'Double tap R on your keyboard to reload,\n' +
    'Shake or press menu button for dev menu',
});

type Props = {};
export default class App extends Component<Props> {

    componentDidMount() {

        //监听推送事件
        AliyunPush.addListener(this.handleAliyunPushMessage);
       //获取deviceId
        AliyunPush.getDeviceId()
            .then((deviceId) => {
                console.log("deviceId:" + deviceId);
            })
            .catch((error) => {
                console.log("getDeviceId() failed");
            });
         //根据用户账号推送
        AliyunPush.bindAccount("granty")
            .then((data) => {
                console.log("bindAccount success");
                console.log(JSON.stringify(data));
            })
            .catch((error) => {
                console.log("bindAccount error");
                console.log(JSON.stringify(error));
            });
        // AliyunPush.listTags('137')
        //     .then((result)=>{
        //         console.log("listTags success");
        //         console.log(JSON.stringify(result));
        //     })
        //     .catch((error)=>{
        //         console.log("listTags error");
        //         console.log(JSON.stringify(error));
        //     });
       //桌面应用图标角标
        AliyunPush.setApplicationIconBadgeNumber(5);
        AliyunPush.getApplicationIconBadgeNumber((num)=>{
            console.log("ApplicationIconBadgeNumber:" + num);
        });
        //获取用户是否开启通知设定 (ios 10.0+支持)
        AliyunPush.getAuthorizationStatus((result)=>{
            console.log("是否开启通知设定:" + result);
        });
    }
    componentWillUnmount() {
        // if (Platform.OS === 'android') {
        //     BackHandler.removeEventListener('hardwareBackPress', this.onBackAndroid);
        // }
        AliyunPush.removeListener(this.handleAliyunPushMessage);
    }

    handleAliyunPushMessage = (e) => {
        console.log("Message Received. " + JSON.stringify(e));
        if (e.actionIdentifier == "opened") {
            alert("我的点击好像生效了")
        }
        //e结构说明:
        //e.type: "notification":通知 或者 "message":消息
        //e.title: 推送通知/消息标题
        //e.body: 推送通知/消息具体内容
        //e.actionIdentifier: "opened":用户点击了通知, "removed"用户删除了通知, 其他非空值:用户点击了自定义action(仅限ios)
        //e.extras: 用户附加的{key:value}的对象

    };
    render() {
    return (
      <View style={styles.container}>
        <Text style={styles.welcome}>
          Welcome to React Native!
        </Text>
        <Text style={styles.instructions}>
          To get started, edit App.js
        </Text>
        <Text style={styles.instructions}>
          {instructions}
        </Text>
      </View>
    );
  }
}

const styles = StyleSheet.create({
  container: {
    flex: 1,
    justifyContent: 'center',
    alignItems: 'center',
    backgroundColor: '#F5FCFF',
  },
  welcome: {
    fontSize: 20,
    textAlign: 'center',
    margin: 10,
  },
  instructions: {
    textAlign: 'center',
    color: '#333333',
    marginBottom: 5,
  },
});


![[转]不可不知的十部交响曲](/images/no-images.jpg)